

Inside the 1877 U.S. Mint: How William Barber Kept Coin Dies From Breaking
Every struck coin begins with controlled violence.
A coining press forces two hardened steel dies against a metal disc, or planchet, under tremendous pressure. One die carries the obverse design. The other carries the reverse. Meanwhile, a hardened steel collar surrounds the planchet. It controls the outward flow of metal and helps form the coin’s edge.
The process sounds straightforward. However, the dies face an enormous mechanical challenge.
If the Mint makes a die too soft, repeated striking pressure can deform it. In 19th-century Mint terminology, the die can “sink.” On the other hand, if workers make the steel too hard, the die can become brittle and crack.
Therefore, Mint technicians needed to find a narrow and critical balance between hardness and toughness.
What Makes a Good Coinage Die?
In modern metallurgical terms, a successful coinage die must balance three major properties:
- Impact resistance: Metallurgists generally describe this property as toughness. The steel must resist shock, brittleness, and compression while limiting permanent deformation.
- Wear resistance: Hardness helps the die resist abrasion, erosion, spalling, galling, and other forms of surface deterioration that eventually make a die unusable.
- Structural integrity: The die must withstand heavy striking loads while resisting fracture, fatigue, and localized sinking. Ideally, it should also deliver the longest practical service life.
During the 19th century, the Philadelphia Mint and other U.S. Mint facilities used established heat-treatment methods to turn ordinary steel die blanks into working coinage dies.
However, workers did not always achieve consistent results.
That problem proved especially important at the San Francisco Mint, which performed much of its own die hardening and finishing during this period.
William Barber Confronts the Die Problem
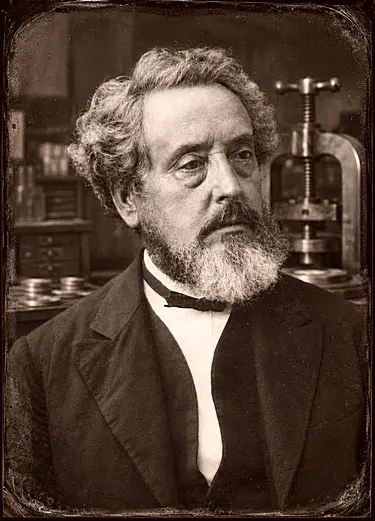
In January 1877, Mint Engraver William Barber explained his preferred methods for hardening and tempering dies.
The timing mattered.
The Mint had already entered an era of heavy Trade Dollar production. Moreover, Congress would authorize renewed standard silver dollar coinage in 1878. That decision would lead to the Morgan Dollar and another enormous demand for working dies.
Barber wanted dies that lasted longer without sinking or breaking.
His January 29, 1877 letter to Philadelphia Mint Superintendent James Pollock provides a rare firsthand account of how the Mint approached that problem.
The quoted passages below preserve Barber’s language. Explanations follow where his 19th-century terminology needs additional context.
Mint of the United States Philadelphia,
January 29, 1877
Hon. James Pollock, Supt. Mint
Sir:
Being directed by your letter to relate my method of hardening and tempering dies I proceed to do so with my reasons for the method. In doing this to make myself intelligible I shall be obliged to repeat much if not all that is already known to the practical men at the Western Mints, and I respectfully disclaim all mention of doing more than my best to promote our mutual object viz., making the dies used possess more endurance.
The first step in hardening process I know is well known to the Gentlemen at San Francisco, and I hear from Mr. Al Downing that they have the same method and apparatus that I have here. Presuming then that we start together with the same means, our mutual object being to obtain the just medium between “sinking” on the one hand and breaking on the other I reason thus. Supposing the die to have had its face properly protected by bone dress, the proper degree of heat obtained and the cooling process rapidly performed, we consider that die properly hardened.
Case Hardening the Coinage Die
The initial operation amounted to a form of case hardening, more specifically pack carburizing.
Barber wanted a compromise. A brittle die could crack during use. However, a soft die could “sink,” or collapse locally, under repeated striking pressure.
Mint workers began with a completed die, including its mintmark where applicable. They placed the die in a metal box and packed it with a mixture of bone ash and powdered charcoal. Mint employees called this material “bone dressing.” [1]
The charcoal provided a carbon-rich environment.
Next, workers sealed the box with fire clay. They then heated it for eight to 10 hours at approximately 930 °C, or 1,700 °F. [2]
During heating, carbon diffused into the surface of the steel. For coinage work, the carbon-enriched layer could extend approximately 0.5 mm to 1.0 mm into the die.
Workers then quenched the hot die.
They directed cool water against the die face first. Afterward, they immersed the entire die in water. Finally, they cleaned away scale and traces of oxidation.
The process produced a hard, carbon-enriched outer layer while retaining different mechanical properties deeper inside the die. The historical reconstruction used here places the carbon content of the treated surface at roughly 0.3% to 0.6%.
Now the Mint had a hardened die. However, Barber still faced another problem.
Hard Enough to Resist Sinking – But Not Breaking
Barber explained the dilemma:
We are now in this position that if the steel is hardened to the core we are saved from the liability of “sinking” in the middle, but at the increased liability to splitting or breaking on the edge or outside. So the next process has been to brighten the rim or shoulder of the die, and stand it on a plate of red hot metal, carefully watching the change of color on the bright shoulder.
Workers apparently used an emery abrasive to brighten the die’s rim or shoulder. That polishing removed surface discoloration and made changes in the oxide color easier to see.
Those colors gave the worker an approximate indication of temperature.
Barber continued:
Which color indicates delicately the degree of re-softening which we call tempering and which regulates all steel goods from the watch spring to the famous Damascus Sword blades. All this is so well known that I hope to be excused for relating it, which I only do to make myself understood as being between the horns of this dilemma Viz: if the die is not hardened to the core, all the way through it “sinks,” if on the other hand the tempering is not low enough by the 2nd process “it breaks.”
In other words, hardening alone did not solve the Mint’s problem.
The die needed enough hardness to withstand compression. However, it also needed enough toughness to survive repeated impacts.
Barber believed the existing process still left room for improvement.
Barber Changes Adam Eckfeldt’s Quenching Method
He next described one of his modifications:
To obviate both I proceed thus. I had the hole (in which the die is inserted when hot to receive the flow of water to harden) a trifle enlarged to admit the steel down lower and expose more of its length to the action of the water. So as to harden a greater length of die as the core arguing that if only a small part of the core at the bottom was yielding its compression by work would fail to support the (top?) and “sinking” would ensue.
The change sounds simple.
However, it addressed an important mechanical weakness.
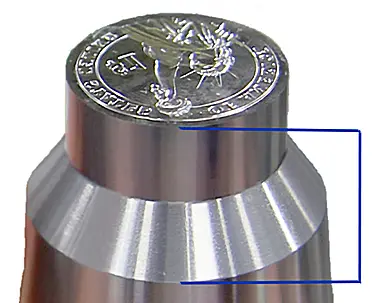
Barber enlarged the hole beyond the diameter of the die face. As a result, cold water could reach more of the steel immediately behind the face.
That change hardened a greater depth of the die than Adam Eckfeldt’s earlier arrangement had treated.
In the original illustration, the area between the blue brackets shows this expanded cooling zone.
Barber summarized his result:
So by this deeper insertion I find I ensure a more thorough hardening….
Yet deeper hardening created another challenge.
The Mint still needed to temper the die.
Why the Old Hot-Plate Method Troubled Barber
Workers traditionally placed the brightened die face-down on a red-hot iron plate. Then they watched the polished shoulder change color.
Barber questioned that method because the heat entered from one end of the die.
He explained:
Therefore instead of obtaining my reduction of hardness (called temper) by reducing it by means of the hot plate from the bottom as usual. I reasoned thus. If I let the heat run up from the bottom, the degree of softness between the top and bottom of my die will vary as the heat will be much greater at its source Viz. the hot plate at the bottom. So that by the time it indicates “yellow” at the top it may be approaching “blue” at the bottom.
That observation requires an important temperature distinction.
The red-hot iron plate itself could reach temperatures in the neighborhood of 600 °C (1,112 °F) or more. However, Barber did not intend the die’s polished tempering surface to reach 600 °C.
Instead, workers judged the die by its oxide colors.
On ordinary carbon steel, yellow or straw temper colors generally appear around 200–240 °C. Purple follows at higher temperatures. Blue appears around 300–320 °C, depending on time, surface condition, and steel composition.
Therefore, Barber watched a moving temperature gradient. One section could show yellow while a hotter area already approached blue.
That uneven heating concerned him.
He continued:
…My next care was to obtain an equally filling tempering and I reasoned thus. To obtain the proper hardening to the core to prevent sinking, I have got my circumference too hard in consequence of its having been the first to come in contact with the water thereby increasing my liability to break.
Barber had identified the trade-off.
His deeper quench strengthened the die against sinking. However, the outer circumference cooled first and became especially hard. That increased the risk of cracking around the edge.
Barber’s Hot-Iron Collar Solution
Experience had shown Mint workers that cracks often started near the outer portion of a die.
The conventional hot-plate method only partly relieved that problem.
Therefore, Barber changed the direction of tempering.
Instead of heating upward from the bottom, he applied heat around the circumference of the upper die. His heated zone extended from the shoulder, where the die diameter begins to taper, toward the upper edge of the face.
![Barber’s differential-tempering concept. The die illustration shows the shoulder taper leading to the die face and the area that Barber’s hot iron collar heated around the circumference. The supplied modern circumferential gear-tooth heating example demonstrates a similar principle: concentrated heating treats the outer working area while leaving the main body comparatively unaffected. Barber did not have modern induction-heating equipment in 1877. Instead, he used red-hot iron half-rings, or a casing, to achieve a related effect. As Barber observed, “[tempering the] extra size of the die beyond the face [also] acts as a collar keeping the center parts together.” Base die image courtesy CoinWeek. Modern differential-heating analogy courtesy Fractory, Ltd., Eagle House, 62 Cross St., Manchester M2 4JQ; Siim Sild, “Case Hardening Explained….”](https://coinweek.com/wp-content/uploads/2026/08/Peripheral-tempering-with-heat.webp)
Barber described the device:
So then knowing my circumference is the hardest and the first to break, I reduce the temper from there, first by the simple means of two heavy half rings of iron made of the height of the die to be tempered measuring from the bottom [i.e., meaning from the face] to the shoulder, and these rings being red hot are made to clasp the too-hard die and thus temper from the circumference to the center.
The two hot iron half-rings surrounded the die.
Consequently, heat moved inward from the circumference rather than upward from a hot plate.
That allowed Barber to temper the hardest and most fracture-prone region first.
He explained his goal:
Thus the center is kept hardest and the extreme the softest (though remaining hard) and it causes the extra size of the die beyond the face to act as a collar keeping the center parts together.
This approach created a deliberate gradient.
Barber wanted the center to remain harder. Meanwhile, he wanted the circumference slightly softer and tougher.
The outer mass of steel could then provide additional mechanical support to the central striking area.
Finally, Barber defended his method:
I believe this simple process in theory to be consistent with reason and I have also verified it in practice. Hoping I have not been intrusive in trying to be explicit.
I have the Honor to be Very Respectfully Yours
William Barber, Engraver [3]
Better Steel Eventually Simplified the Process
Barber’s 1877 method depended heavily on worker skill.
The composition of the steel mattered. So did furnace temperature, exposure time, quenching speed, water flow, surface preparation, and the worker’s judgment of temper colors.
Therefore, small variations could produce large differences in die life.
By about 1890, however, the U.S. Mint Bureau had standardized the composition of its die steel more closely. [4]
Element Percentage:
- Iron 98.605%
- Carbon 0.970%
- Silicon 0.210%
- Phosphorus 0.016%
- Manganese 0.180%
- Sulfur 0.019%
The composition totals 100%.
Notably, the steel contained nearly 1% carbon. That places it firmly within the range of high-carbon tool steels.
Commercial steelmakers also offered comparable specialty tool steels by this period. As a result, the Mint could begin with material that offered much more predictable chemistry.
That development simplified hardening and tempering. More importantly, it helped the Mint achieve more consistent die performance and service life.
Why Barber’s 1877 Letter Matters
Collectors normally study dies through the evidence they left on coins.
Die cracks, cuds, sinking, clashing, polishing, and other features reveal what happened after a die entered a press.
Barber’s letter takes us one step further back.
It shows Mint officials wrestling with the physical limits of steel before the first coin ever left the press.
More importantly, Barber understood the central problem clearly. Maximum hardness alone did not produce the best die. Maximum softness certainly did not.
Instead, successful coinage required controlled differences in hardness, toughness, and structural support.
In 1877, Barber tried to achieve that balance with water, heat, polished steel, and two red-hot iron rings.
The method looks simple today.
Yet millions of coins depended on getting it right.
by Roger W. Burdette
Copyright 2026. All rights reserved.
Citations
[1] This method is inexpensive and simple, but it does not yield consistently repeatable results. Alternatively, a paste of bone ash and charcoal was applied to the die face, rather than pack the entire box.
[2] The Philadelphia Mint’s 18th-century usage appears to have exposed all of the steel die to carbon, but this made the bulk of the die too brittle. Sometime around 1800, soft dies were put face up in the metal box and covered with a thin iron plate with holes cut through which the die face and immediate top protruded. Carbon was packed and the box heated as described in the body text. By separating the face from the die body, more carbon diffused into the face and it became harder than the rest of the die. This reduced brittleness of the die body while allowing the face to become the hardest and most brittle part of the die.
[3] RG 104 entry 229, box 2 of 17. Letter dated January 29, 1877 from W. Barber to Pollock.
[4] Philadelphia Mint, Box: Ledgers Coining #3, “Coinage Specifications 1890-1905.”

Very interesting read a lot sure went into finding the right stuff to maker the best coins , U.S.A. coinage !!
Fascinating!