By Roger W. Burdette, special to CoinWeek …..
All United States coins have three sides. Collectors pay most of their attention to the obverse (the front or “portrait” side), and the reverse (the back or “denomination” side). Those are where the “meat” of a coin – its design, date, denomination, mintmark, and so forth – are found. But the edge also includes interesting information, and in some cases, what’s on the edge can make a huge difference in desirability.
An “edge collar” or “edge die” is a steel disc about five to 10 millimeters thick, 100 mm in diameter, with a circular hole cut in the center[1]. For plain edge coins, or those with incuse ornaments, this hole is the exact diameter of the finished coin. If a coin has a reeded edge, then the hole’s diameter is that of a finished coin less the depth of the reeds. In this way the completed coin has its correct diameter when measured over the reeds. A similar approach is used when a design has raised ornaments on the edge.
There are three basic types of edge dies, or collars, that were used by the United States Mint: open, close, and segmented[2]. All three collar types were supported in the press by heavy springs. This allowed the collar to move downward if it were accidentally struck by the hammer die or when a planchet did not seat fully in the collar.
Open Collar
An open collar was used for most U.S. coin denominations from 1792 through part of 1828[3]. This was followed for smaller diameter coins with a close collar in 1829, then larger coins, and finally, a segmented collar for eagles and double eagles, beginning with the Saint-Gaudens designs of 1907-1933.
Open collars were a little greater in diameter than the planchet and were primarily a device for centering planchets on the bottom (“anvil”) die. The Mint used a Castaing edge milling machine to add incuse ornaments or lettering to a planchet before striking[4]. During striking in a screw press, pressure from the dies deformed a planchet slightly and also partially crushed the edge lettering. If the collar were too close to the planchet, striking would cause further damage to edge lettering.
While an open collar minimized damage to edge ornaments, it also allowed metal to flow unevenly. This created larger coins with irregular diameter and thickness, and distorted lettering near the edge.
Early on it was observed that planchets for half dimes and dimes deformed very little when they were cut out, and were too thin for edge inscriptions. This allowed edge collars for these small pieces to be close enough to the planchet that on striking the expanding metal was pushed against reeds cut into a collar. This produced visible reeding on all or part of the edge. Small coin reeding was also incomplete because planchets were not entirely uniform in shape or diameter[5].
Close Collar
The most familiar edge die is a called a close collar. This is simply a wide ring of hard steel which prevents a coin planchet from expanding beyond the collar’s diameter. The inside surface of a closed collar can be plain, or it can have vertical grooves, called “reeds”, cut into it. A planchet is cut to be slightly smaller than the collar, and when struck by dies, the metal is pushed into the face designs, and the edge reeds.
In 1827, blanks were put through an improved Castaing machine with plain flat dies. This improved the uniformity of planchet diameter and thickness, allowing regular use of a close collar for some U.S. coins beginning in 1829 with dimes and half dimes. Quarters with complete edge reeding were added in 1831.
Mint director Samuel Moore wrote about these improved half dimes and dimes in August 1829:
If our half dismes have not yet reached Washington through the Banks, I will send you if you please, 5 or 10 dollar’s worth, which you can replace by a Bank note. Would it be acceptable, or would it be liable to be misconstrued, if I should at the same time send a like specimen of them to the President or to any other members of the Cabinet? They are praised but are not perfect, though, like the Dismes of this year, superior to any coins heretofore issued; the higher edge given by milling with the blank margin round the head, are valuable improvement. No [new] original dies are necessary in order to improve them as I wish, and, shall ultimately, I hope, accomplish[6].
Drawings for modifications to the Mint’s Castaing machines have not been identified.
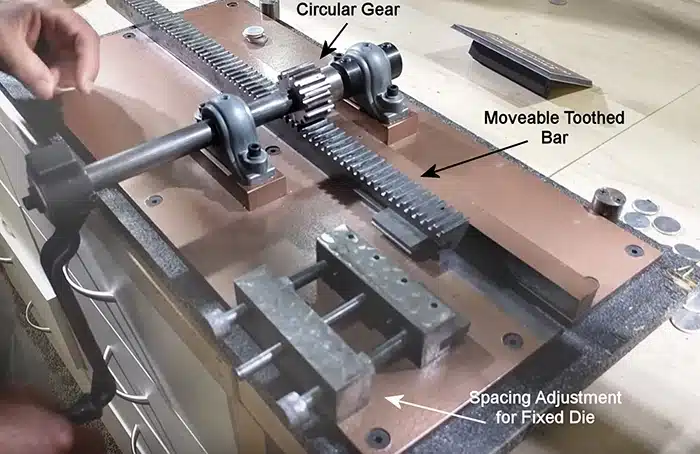
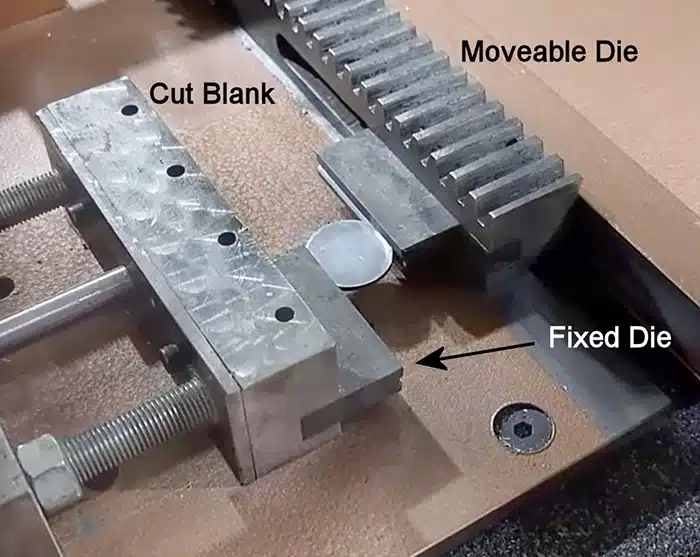
However, the simplest change would be to place the moveable die on a slider-crank powered by a geared hand crank. This would have produced a continuous back-and-forth sliding motion. When mounted on an incline and equipped with a gravity feeding tube, it could allow rapid milling of blanks between the dies. With no need to restrict a blank to a half turn, this would produce several hundred uniform planchets per hour[7].
A close collar with vertical reeds cut into it became part of the Philadelphia Mint’s standard suite of newly designed equipment in 1836:
The dies for the new dollar have been sunk by Mr. Gobrecht and the impressions approved by the Treasury Department. I am exceedingly desirous that you shall take, without delay, the necessary measures for an early issue. I pray you to have the hubs and working dies prepared, and the proper arrangements adopted for cutting and milling the planchets, and coining them in the large screw press – the pieces being struck in a close reeded or grooved collar.
The employment of the screw press is only to be temporary, and you are aware that it is of great importance that the lever-press [i.e., toggle press] for dollars should be completed at as early a day as possible. For this purpose, the machine shop being now ready, I beg you to use every exertion to find suitable workmen, in addition to those already in the Mint, who may be employed upon the new press ‘till it be finished; those men not to be enrolled among the regular hands, but to be engaged only for this special object; and paid from the appropriation for new machinery, etc.[8].
Vertical reeds were cut into early close collars with narrow files. Later, mint machinists used a knurling tool in a lathe to cut uniformly spaced reeds. This was a great improvement over manual filing, but occasionally produced overlapping reeds. In about 1885 the New Orleans Mint began using a reeded steel bar, called a “drift tool” to cut all the reeds at the same time, and ensure uniformity. It was not until, about 1899 that this method was adopted for all edge collars[9].
This contemporary letter and illustration help explain a drift tool:
…The Philadelphia Mint uses a knurl to put the reeding in the collar. The collar with a bored central hole is put in the chuck of the lathe and allowed to turn. The knurl is held inside the collar while the latter revolves, thus cutting the ridges. Much depends of the first few revolutions of the collar as to the number of ridges. A knurl will fall into these places after they are once started. If the bore of the collar is a little large, the number of ridges will be more. [If the wrong knurl is selected, the collar will have too many or too few reeds.]
2) A slight taper is necessary in order to relieve the money easily and this is done by giving the knurl a slight incline as the collar revolves. If the knurl is held at a greater incline for one collar than another, then the taper will differ. [The depth of reeding might also differ from one face of the coin to the other.]
3) The third trouble is due to the holding of the knurl a rather a double angle which gives taper and also makes the ridges slant across the edge of the dollar, instead of being square with the face. One of the collars [made in Philadelphia] we have shown this defect.
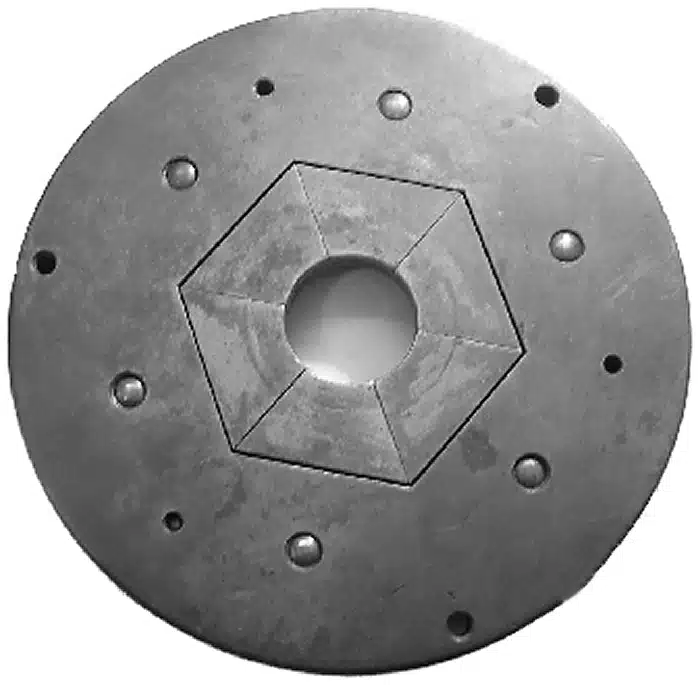
The method used at the New Orleans Mint – This method is very simple and insures uniformity. A [cylindrical] punch is made giving it the proper taper and with the ridges cut on its surface. After the collar [central hole] is turned, the punch is pressed into it until the ridges are deep enough. This may be seen by drawing the punch out and testing with a gauge. There is no particular wear on these punches and those here have been used a great many years. Following is a diagram of a dollar [collar reeding] punch.

The cross spaces on the punch are to form the cutting edges and also allow the cut metal to clear itself much in the manner as is found in taps for thread cutting tools. [The cutting portion of the punch is about 2 inches long.] I should advise this punch method for making all the collars because it is exact, rapid and practicable[10].
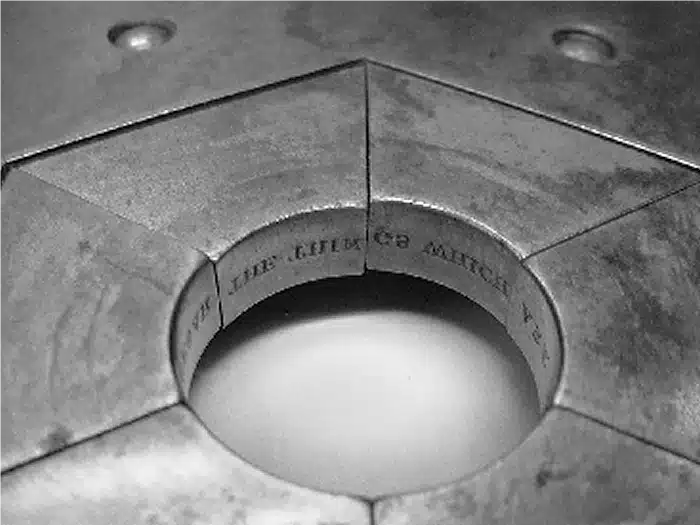
Segmented Collar
A common variation of the close collar cuts the ring into three to six segments. Inscriptions or ornaments are punched into each segment, which produces raised characters on the edge of a coin after striking[11]. If the segments have raised letters, the coins will show incuse letters after striking. These will be much sharper and better defined than if the planchet were given incuse letters before entering the press.
A system of gears and springs shift the segments from open to closed, then back to open to release the coin.
The best known use of a segmented collar[12] was during manufacture of the Saint-Gaudens eagles and double eagles from 1907 to 1933. Eagles had 13 raised stars on the ends, and double eagles had the motto “E Pluribus Unum”. Variations in size and placement of edge devices are known or rumored, but few specimens have been examined, largely because so many of the coins are in plastic authentication company holders that prevent the edge from being examined.
This concludes the basics. For more information and details, see the references listed below.
* * *
Notes
[1] The collar could just as readily be square or any other shape, and the hole merely matches the final shape of a coin.
[2] All post-1850 collars have top and bottom sides. The central hole is made slightly wider on the top to facilitate ejection of struck coins.
[3] “Open” is not really the best term for this because open and “close” collars are identical except for the relation of hole dimeter to coin diameter. I’d prefer to call it a “wide” collar, but numismatic convention overrules that idea.
[4] This was invented by French machinist Jean Castaing in 1685 and evidently based on an edge normalizing and marking device by Pierre Blondeau (ca.1620-1664) a Frenchman working in the London Mint.
[5] Using a Castaing machine for small denominations coins was inefficient due to the large quantity of pieces that had to be produced.
[6] RG104 E-3 Journals to 1837\Journal 1824-1831. Letter dated August 8, 1829 to Treasury Secretary Samuel D. Ingham from Samuel Moore.
[7] This and other forms of reciprocating motion would have been well known to active machinists and equipment builders. Franklin Peale used circular motion on a horizontal plane mill blanks into planchets in his improved machine.
[8] RG104 E-1 Box 17. Letter dated September 22, 1836 to Adam Eckfeldt, Chief Coiner from Patterson.
[9] See Roger W. Burdette’s From Mine to Mint (Seneca Mill Press, 2014) for details.
[10] RG104 E-685, Box 137. Letter dated January 24, 1899 to F.A. Vanderlip, Asst. Sec. Treasury from H. J. Slaker, New Orleans Mint.
[11] A close collar also helped prevent “fishtailing” of peripheral inscriptions common with open collar use.
[12] Virole brisée: literally, “broken shell”.
References
Burdette, Roger W. From Mine to Mint. Seneca Mill Press. 2014.
Ferguson, Brian. “Upsetting mill/Castaing machine at the ANA mini mint,” video and ANA Money Museum, https://www.youtube.com/watch?v=cLIlTetETG0. https://www.money.org/money-museum.
Johnson, Dick. “More on Jean Castaing”, The E-Sylum, January 15, 2012.
https://www.ngccoin.com/coin-grading-guide/grading-small-size-capped-bust-quarters/
National Archives and Records Administration Record Group 104 (U.S. Mint) Entries 1, 3, and 685.
Rea; Rory R., Glenn Peterson, Bradley S. Karoleff, and John J. Kovach, Jr. Early Quarter Dollars of the United States Mint. Whitman Publishing LLC. January 1, 2010.
Tompkins, Steve M. Early United States Quarters 1796-1838. Tompkins & Destni. January 1, 2008.
Tungate, Sue. Matthew Boulton and the Soho Mint: Copper to Customer. University of Birmingham. 2010.
* * *